CMO's begginer guide (pt. 3)

If you haven't read the first two part, here they are: first one, second one.
Expanding your collection
How to expand your digimon archive
To expand your digimon archive you'll need an item called "Archive Expansion +1", this will allow you to deposit more digimon in the Digimon Center. This item can be dropped in both hero and leader digimon.

In order to use it, go to "D" NPC in Baba's Land or Mudfrigimon Village, click on "Digimon Archive" option and expand it with "Archive Expansion" option.
Card evolution
"Which digimon should I capture?" this question should be personal, right now you may capture based on your preference or on the digimon strength. This is a tutorial, so, I'm going to cover some strong digimon that will help you get further in the game quicker.
Starting with Agumon line, I recommend you to capture two Agumon: one will become Wargreymon X the other will become Black Wargreymon X. These two lines are extremely powerful and quite cheap for a begginer, you may even drop them killing Wargreymon X heroes or doing the second floor of Royal Base (Black Wargreymon X). Besides that, Metal Garurumon X and Mervamon are good choices too. All those lines are strong because of their traits and build which are DPS oriented.


With all those lines, you'll have strong digimon with every possible attribute: Wargreymon X (VACCINE), Black Wargreymon X (VIRUS), Metalgarurumon X (DATA) and Mervamon (UNKNOWN).
In order to make card evolutions, go to Bokomon (69,45) in Baba's Village with the target digimon and its card, one evolutor and BITs. I recommend reaching all specifications on the card otherwise your success percentage will drop dramatically.

Obs.: Black Wargreymon X, Mervamon and Metal Garurumon X, all have prior evolutions, so, you'll need to do Black Wargreymon, Minervamon and Zeed Garurumon first.
Other possibilities
Besides card evolution, there are four sacred beasts: Baihumon, Zhuqiaomon, Ebonwumon and Azulongmon. To make them, you'll need a level 100 digimon and 12 digicores of the specific sacred beast you want. With every requirement you now need to go to Geko Woods E (117,170) and talk to Jijimon).

Talk to him, select the second option, then the first. The following menu will appear:
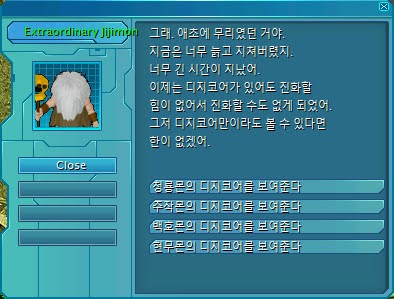
From top to bottom: Azulongmon, Zhuqiaomon, Baihumon and Ebonwumon. Choose the option and then the digimon.
All beasts have their own strengths:
Ebonwumon is a tanker digimon and could be done in Shakkoumon. In Shakkoumon line, Ebonwumon turns into one of the best tankers in the game, with a high quantity of both CON and INT and two traits: a self healing one and an evasion one. The recommended capsule trait for it is Provocation.
Baihumon is a DPS oriented digimon, we generally use it in Ryudamon. His build has a huge quantity of both STR and DEX and it has a powerful trait called Double Attack, making your digimon's damage double. The recommended capsule trait for it is Rage Strike High.
Zhuqiaomon is a digimon generally used for farming, we generally use it in Ryudamon. Its has a decent damage, the highest speed of all sacred beasts and three points in INT which may grant it a higher chance of trait activation (Double Attack). The recommended capsule trait for it is Effective Attack Low.
Azulongmon is the weakest and cheapest of them all, which may be used similarly to both Zhuqiaomon or Baihumon.

Leveling up
This is the last leveling up step, though it's not the hardest one. There are two maps where you may level up: Labyrinth Hard Mode from level 100 to 130 or Waterspace Dungeon from level 110 to 130. Lab Hard is easier to finish, that's why I'm going to focus on this map.
To enter this map, you'll need three requirements: a passe, tamer level 301. Having a level 100 digimon is not a requirement, but you'll only gain experience past this level.
Dropping Lab Hard pass
This pass is dropped from Pharaohmon (128,30) in Labyrinth 3F. It's called "An Unidentified Invitation".


How to enter and navigathe through Lab Hard 1F
Just use "An Unidentified Invitation" and you'll be teleported to top left corner of the first floor. When entering, you'll be in the same map as Labyrinth 1F, so you may navigate through the map down bellow. Be cautious, in this map you'll start random fights while walking, that's why the party leader won't walk in this map but another member.

How to navigate Lab Hard 2F and level up
Lab Hard 2F is exactly the same as Labyrinth 2F. When you first arrive at the map, type ".unstuck" in the normal chat and you'll be teleported near the entrance of Labyrinth 3F.

In Lab Hard 2F you may find some boxes in the floor. Use them to start fights against five Armageddemon, this battle can be extremely hard, so come with other people who will help you. Remember to use good cards like Avalon's gate.


These battles give you an insane amount of experience, so the proper way to level up in this map is sitting still near a box and opening it many times. Sometimes using the box won't start a fight, you'll receive a mark each time this happens and you'll be able to enter Lab Hard 3F when you have 5 of those marks.
How to navigate in Lab Hard 3F
Labyrinth 3F doesn't have a minimap, so does Lab Hard 3F, but it's not necessary. Your party leader will just keep walking until the party reaches 21 marks, which are equivalent to 21 battles. After that, you'll start a fight against Barbamon. This boss is extremely powerful and can kill you easily if you are alone. I recommend using Royal Knights Force, because sometimes "All Delete" will be activated.
Upon killing it, you'll automatically earn some items and be teleported to Digital Heaven.

Items
These items are not for ultra late game, they are the basic set for late game.
Capsule
These capsules are similar to the previously cited ones, but instead of HP, Defense or EVP they'll have Attack bonus. I recommend buying one of each.

Crests
This time, the recommended crest will be Crest of Courage +10. It's stronger than Omega Crests.

In order to get it, you should kill Metal Greymon V (85,100) or Metal Greymon B (61,180) in Gear World W. If you don't have Effective Attack Low, I suggest you killing the B version of this digimon. If you have Effective Attack Low, I suggest you killing the V version of this digimon, since it has a higher chance of dropping Crests.

To upgrade those crest, you'll need to talk to Babamon (45,90) in Mudfrigimon Village. In some advanced upgrade, you'll need Item booster and Digimon's Blessing.


Pets
We generally don't speak a lot about pets, but they are fundamental in this game. You may drop Piximon, DigiGnome or MarineAngemon eggs on Royal base. Culumon is only sold for DP in the shop, this specific pet increase your drop rate, besides all the listed bonuses below.
You may hatch these eggs in the Pet Hatchery (81,109) in Digital Heaven.

Pets will need food to keep alive, because of that, I recommend you always having the following item:
Besides those pets, you also may have Pichimon. This pet not only gives you some bonus to experience, but also keeps your evolution outside of the battle independently of Deva Aura. You may buy it in Digital Heaven on the medal shop (".mshop"). You may hatch it in the same Pet Hatchery mentioned above.
This pet also need food to survive, but its food is different from the others pets. Its food can be bought on the medal shop and will regen all its HP.

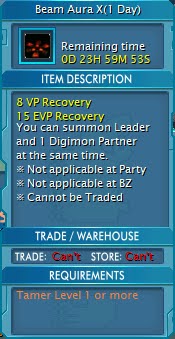
When we talk about Pichimon, it's important to talk about the Beam Aura. Since you'll not need Deva Aura anymore, you may use a Beam Aura, this one summons a second digimon into battle upon entering.
This aura can be obtained from Nanomon (43,98) in ".eventmap" using Digicode H.

Clothes +9
Clothes are essential part of late game experience, they are extremely expensive, but they give you a huge Attack bonus.
There are 8 slots for clothes, but only six can be upgraded. Five of those will give you Attack bonus: hat, shit, coat, pants and shoes. The sixth one will give you experience bonus: costume, for example, a cowboy one.
Clothes have a limited amount of time, they'll expire after 30 days. To avoid letting them expire, you'll need to repair them constatly with Costume Repair Kit.
To use this item, your cloth still needs time left. Take them to Mimi's mother (99,127) in Lucky Park. Click on Mimi's mother and select the third option from top to bottom, after that, insert the cloth you want to repair and the Costume Repair Kit.
In case you let your clothes expire, you'll need another item called Costume Repair Kit Premium, this one is pricier than the normal version, so, don't let your clothes expire.
Jewelry
These jewels are know as Shining Yggdrasil Set, they're stronger than Brilliant ones. And they'll also activate a bonus if all pieces are equiped.
D-ark
This D-ark may be dropped in Lab Hard in Barbamon Fight. One of the best options in the game.
Capsule Trait
My recommendation is Rage Strike High in DPS digimon, for example, Ryudamon, Wargreymon X, Black Wargreymon X, Metal Garurumon X, and Mervamon. This item is stronger than killers because of its use against all attributes, while Killer can only increase damage against one specific. Don't use Rage Strike High in every single digimon right away, I'd recommend buying only one first and equiping your strongest digimon first.
Overprogram
This item is important to high level digimon, for example, 129. It'll exchange 2 skill points for 1 status point for the cost of 1.000.000 BITs or 1 Item Booster per point. I'd recommend you using the Item Booster option.
To use it, go to Toucanmon (46,32) in Baba's Village. Distribute all possible skill points in prior evolutions, otherwise you'll not be able to convert skill points. Click in "convert", select your digimon and select the quantity of points you want to convert. If you make this at level 129, all possible skill points will be converted.
Obs.: If you do any type of evolution after using overprogram, it'll restore any converted skill points, so, I'd recommend you doing this process after fully evolving your digimon.
Have fun playing!
A special thanks to both Teixeira and Cusoca for letting me use their digimon lines' images.
Tutorial made by: Sotin
Fonts:


Comentários
Postar um comentário